


The summer time Milky Way was photographed from a hilltop over the Modoc Plateau in California utilizing ten 3-minute exposures and a Sigma Artwork 14mm lens. All images have been taken with a Nikon D750 DSLR, pre-processed in Adobe Bridge, and post-processed in Adobe Photoshop. Credit score: All photos by Frank Dibbell
I like taking wide-field photos of the evening sky. Revealing the hidden depths of a big swath of the heavens in a long-exposure {photograph} reveals me that space isn’t really empty — it’s crammed with unfathomably massive quantities of gasoline and dust. And with as we speak’s cameras and specialised filters, amateurs can produce beautiful views of the heavens that exceed what skilled observatories might produce just some quick many years in the past.
That is very true in wide-field imaging, which has a number of benefits over extra specialised astroimaging setups. These embrace price, portability, and near-immunity to dangerous seeing — facets that enchantment to newbies and skilled astroimagers alike.
The universe is crammed with wondrous sights, and wide-field imaging know-how can show all of it in dwelling shade.
Finest newbie techniques
One motive wide-field imaging is so compelling is that you simply don’t want a whole lot of costly tools to make nice photos. A DSLR digital camera on an equatorial monitoring platform with a wide-angle lens is ideal for a shot of the Milky Way — whether or not it’s solely overhead or framed towards a panoramic background, akin to a mountain vary or desert plain.
You too can seize wide-field telescopic views. There are a variety of telescope producers who make refractors with quick focal lengths, usually 50mm to 80mm in aperture with focal ratios starting from f/4.5 to f/6. These make environment friendly lenses for capturing wide-field topics when paired with a DSLR, mirrorless, or CMOS imaging digital camera with a minimum of an APS-C-sized sensor. Mount this gear on a small equatorial mount paired with an off-axis guider or exterior information scope, and also you’ll have your self an exquisite wide-field imaging system. My favourite wide-field system makes use of a 71mm refractor with an APS-C-sized CMOS digital camera on a small equatorial mount.
Whether or not you may have a small refractor with a devoted digital camera or an equatorial platform and DSLR, each mixtures are extremely moveable, comparatively straightforward to arrange, and may produce beautiful photos in a single night beneath the celebrities. This is a vital side to contemplate if you’re like me and should journey to a dark-sky web site. When you may solely spend a single night in a location, capturing a wide-field topic turns into an ideal objective.

Choose your battles with the sky
In all types of astronomy, our environment dictates what we are able to and can’t do each evening. Along with the apparent points like clouds, the environment can even current limits to transparency (dust, smoke, and water vapor) and seeing (turbulence). So far as clouds and transparency go, sadly there may be nothing to be performed. However seeing, however, we are able to do one thing about. That is the place wide-field photos come completely into play.
On nights when the seeing is beneath common, the quick focal lengths of wide-field imaging techniques do very effectively. These techniques might have picture scales of 4 to six arcseconds per pixel, whereas a extra conventional imaging platform might have picture scales of 0.5 to 2 arcseconds per pixels. An evening of below-average seeing, the place the environment limits decision to 4 or 5 arcseconds, will sideline the standard imaging system. However a wide-field system with a picture scale bigger than the seeing decision won’t be affected. This immunity from below-average seeing is probably the largest good thing about all.
One in every of my favourite wide-field imaging techniques consists of my astromodified Nikon D750 mounted on an equatorial monitoring platform. That is excellent for capturing huge vistas of the Milky Way and celestial guests like brilliant comets. It’s extremely moveable and suits right into a backpack. I’ve used this technique a variety of occasions when circumstances dictated a hike to the most effective spot for a photograph. One instance was after I captured the summer time Milky Way from a hilltop over the Modoc Plateau in northeastern California (web page 40). For this wide-field shot, I used my Nikon D750 with a Sigma Artwork 14mm lens on an AstroTrac equatorial monitoring platform.
One other photograph location requiring a little bit of a hike was the picture I took of Comet C/2020 F3 (NEOWISE; see picture at prime left). This was shot with a Nikon D750 and the Rokinon 24mm lens carried on a Vixen Polarie equatorial monitoring platform. Being extremely moveable is one nice benefit of a wide-field system!

The sky is your oyster
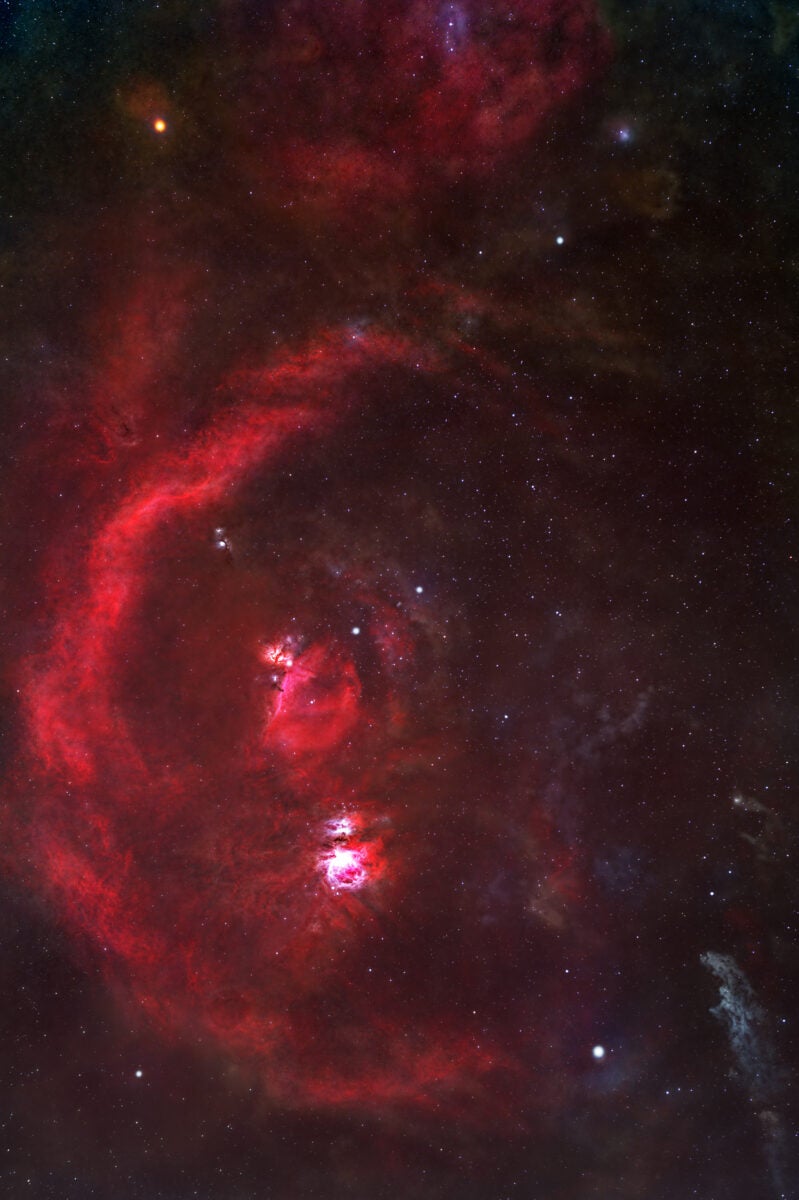
Constellations are additionally wonderful wide-field targets. Orion is a fabulous candidate as a result of there are a number of objects inside its boundaries to shock you. This space is wealthy with ionized hydrogen, so I added a 12nm clip-in Hydrogen-alpha (Hα) filter to my Nikon particularly to seize all of Barnard’s Loop (Sharpless 2–276), in addition to the well-known Orion Nebula (M42) and Horsehead Nebula (Barnard 33). With a Sigma Artwork 85mm lens on an equatorial platform, I took five-minute Hα exposures and three-minute RGB exposures (bottom-left photograph on web page 42).
One other favourite wide-field system of mine consists of an Askar 200mm f/4 Astro lens paired with my Nikon D750 DSLR and an Optolong L-Final filter, which passes Hα and Oxygen-III (OIII) wavelengths. For this setup, I take advantage of a small equatorial mount for guiding and imaging.
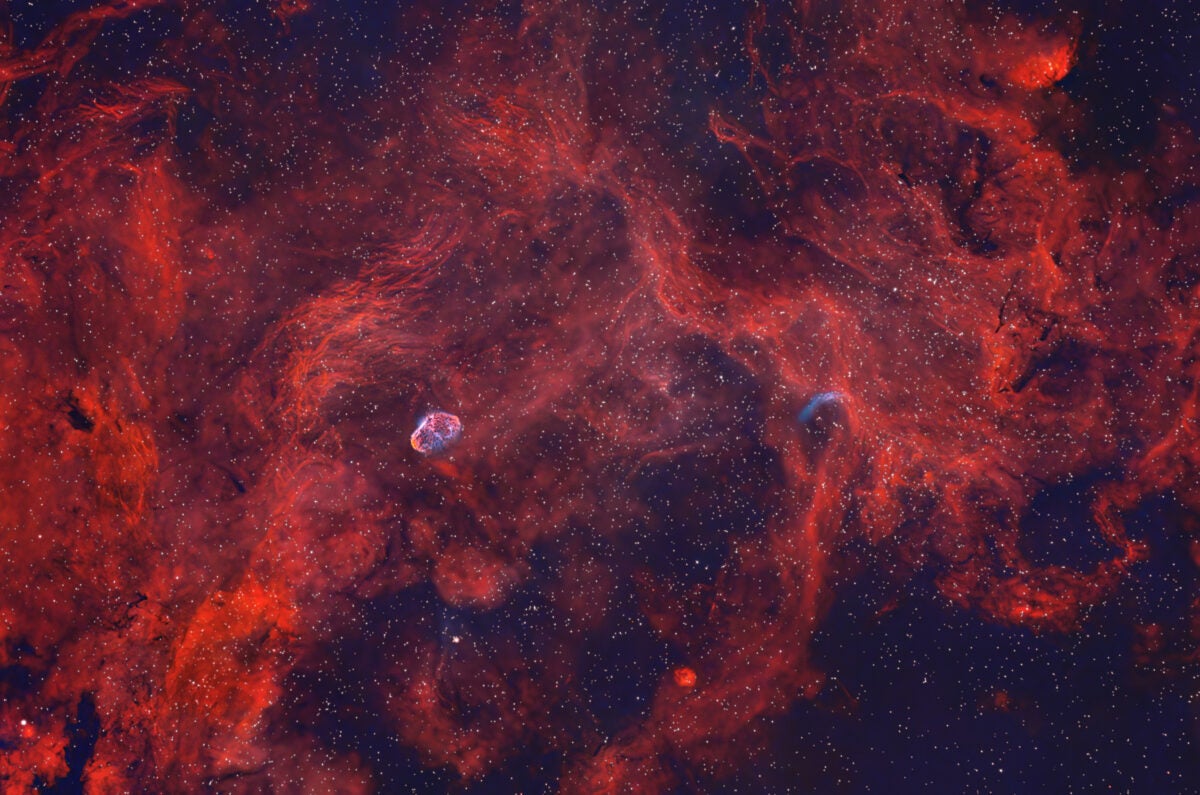
Through the summertime, round June, the constellation Cygnus is completely positioned to take wide-field pictures of its numerous sections. One spotlight is the Sadr Area in Cygnus (top-right on web page 43), a subject roughly 6° by 9°. The area options wealthy nebulosity in addition to objects such because the Crescent Nebula (NGC 6888), the blue-colored shock wave from the Wolf-Rayet star generally known as WR 134, and the Tulip Nebula (Sharpless 2–101).
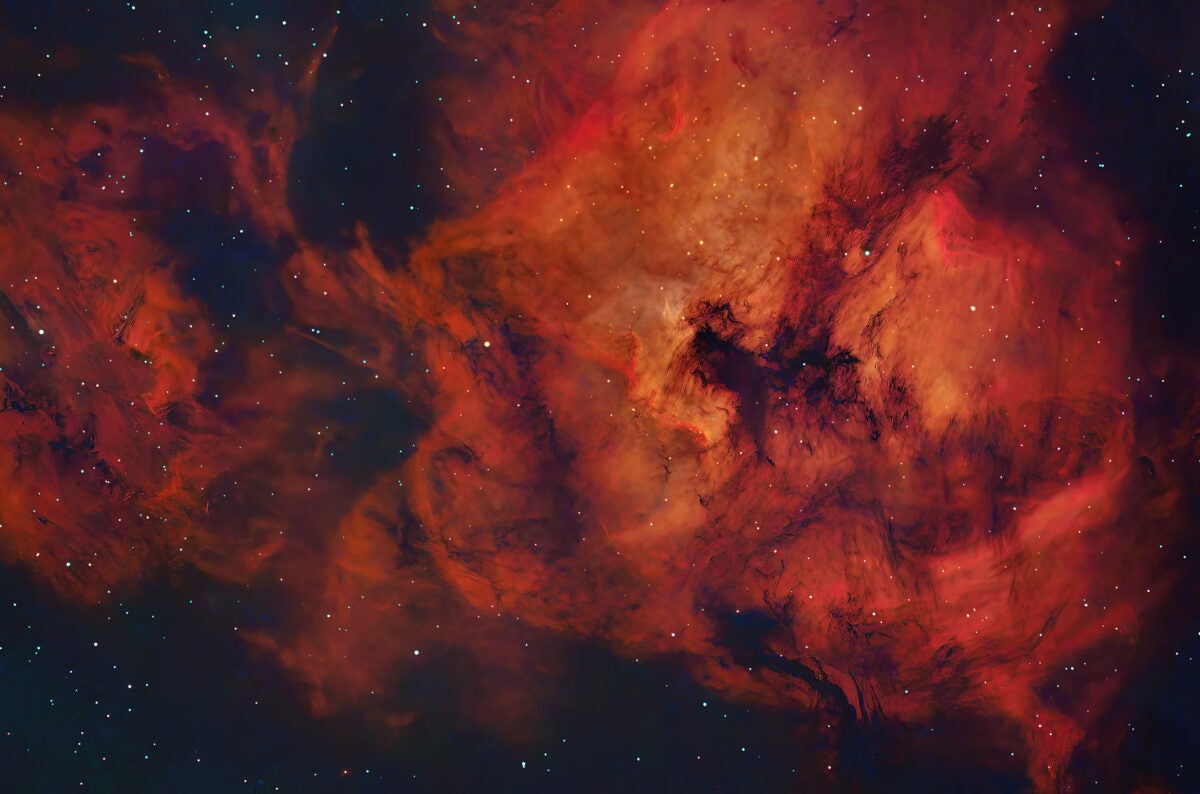
One other common space of Cygnus for a wide-field imager is the North America Nebula advanced. This subject is saturated with ionized hydrogen — a lot in order that the North America Nebula (NGC 7000) and its companion, the Pelican Nebula (IC 5070), can seem misplaced in an undulating crimson sea (prime left).
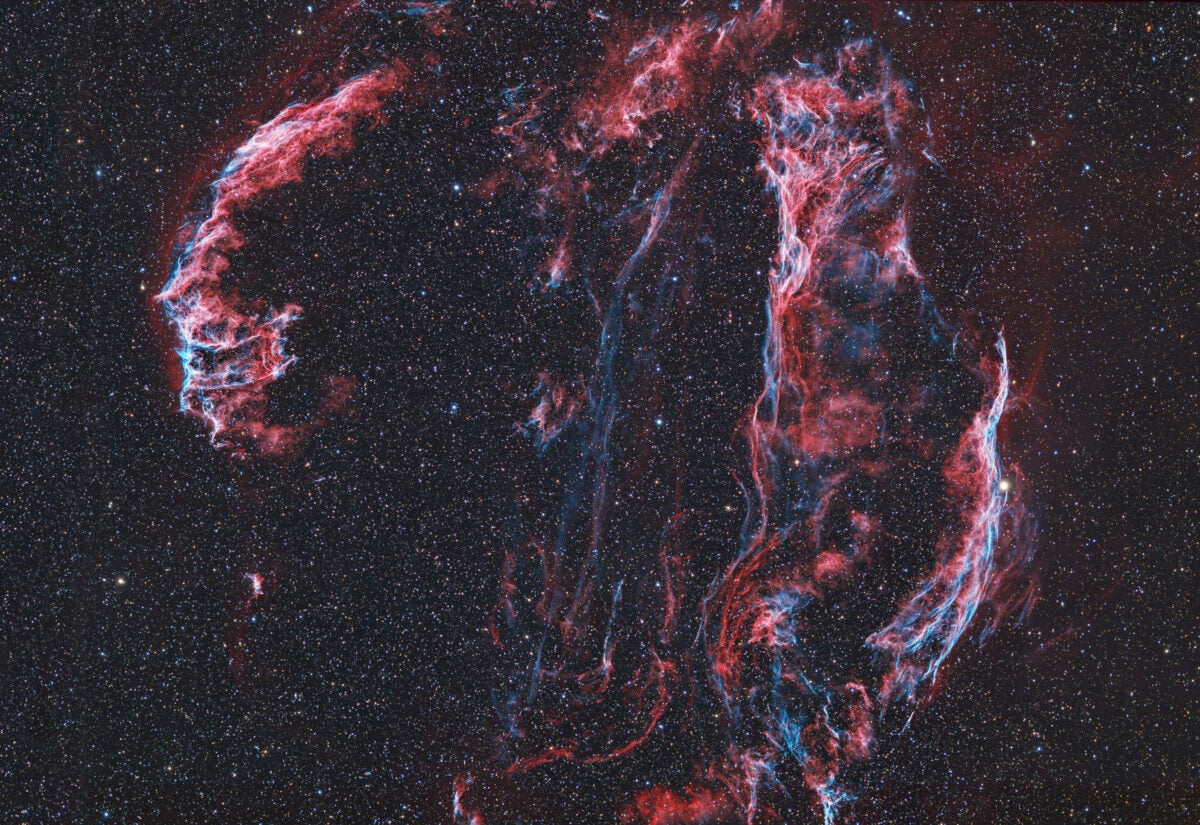
My largest wide-field system pairs a 71mm f/4.5 refractor with my APS-C-sized CMOS digital camera — it offers excessive element and the choice of taking wide-field panoramas. Including a filter wheel to the monochrome CMOS digital camera permits extra flexibility when processing the picture. I personally prefer to shoot with the Hα and OIII filters to create a bicolor picture of nebulosity, then shoot with RGB filters to seize the colours of the background stars within the subject. I photographed the Veil Nebula advanced (backside left) with this technique, combining my bicolor Hα/OIII exposures and the right star colours from the exposures with my RGB filter set. Be aware that there are lots of strategies for these actions, it’s all about experimenting and discovering the one which works greatest.

A broader view
Once in a while, nature will intervene and do its greatest to mess up a wide-field session. One second you’re establishing your system for the proper shot; the subsequent, you see a number of clouds magically seem.
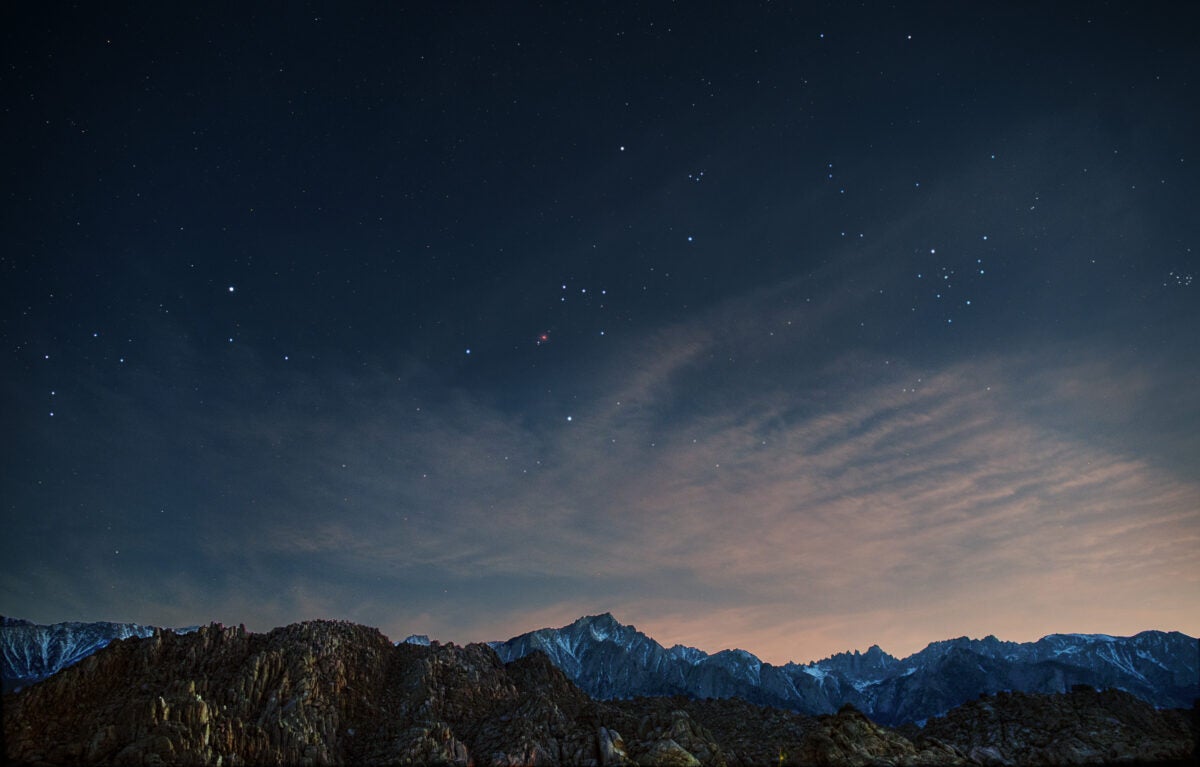
This very situation occurred on a visit I took to {photograph} the winter Milky Way setting over California’s Mount Whitney. I arrange my tools at sundown and waited patiently for darkish, however then clouds began forming. It was clear that quickly there can be no Milky Way to see, a lot much less {photograph}. However once you’re capturing a large subject, you may have the pliability to improvise. As you may see within the photograph above, I’ll not have captured my Milky Way shot however I nonetheless captured an exquisite photograph of the constellation Orion setting over the height, with the clouds as an integral a part of the image.
Huge-field imaging is a good way for a newbie to start out out in astroimaging, however that’s not the one motive to do it: Regardless of your talent stage, studying the way to {photograph} in wide-field offers you an exquisite complement to extra conventional narrow-field views. By portraying celestial objects of their bigger environment, we are able to achieve a distinct perspective of the sky overhead, and see our wondrous universe as a grand vista.


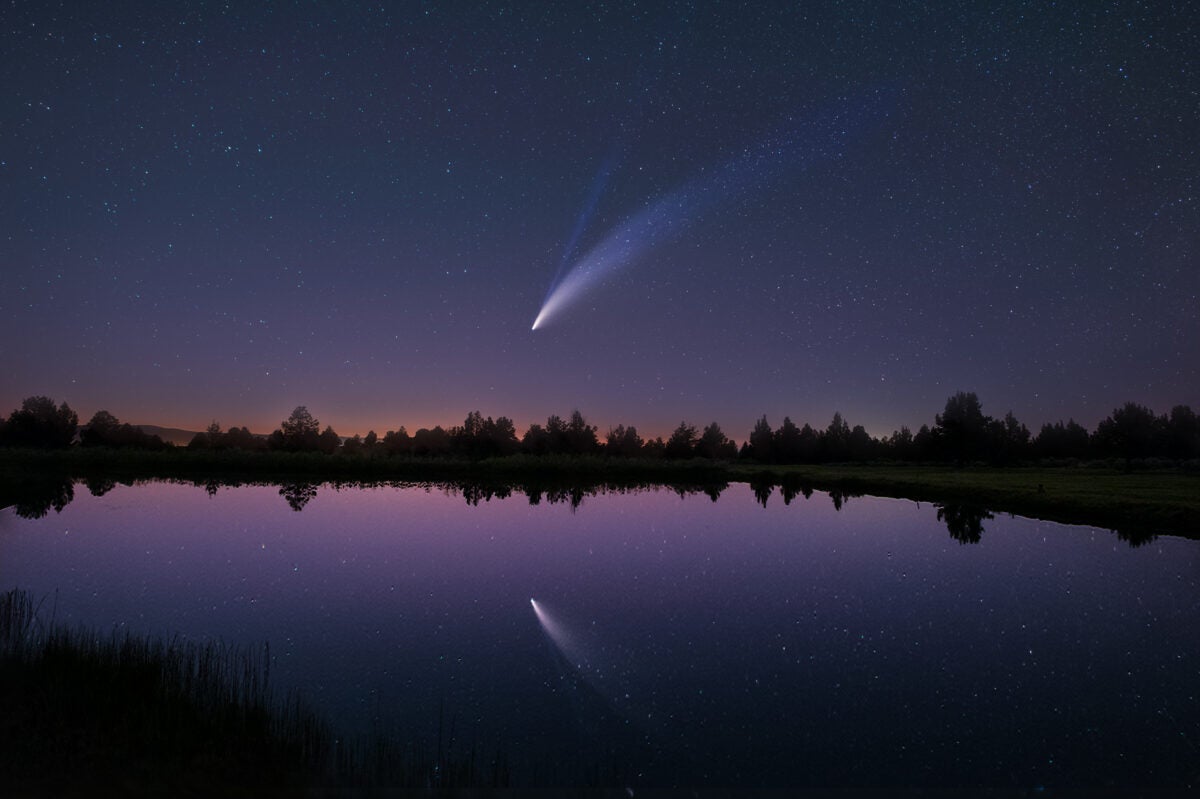
second exposures have been taken for the comet and one 30-second publicity was taken for the foreground.

A phrase on huge fields
It’s troublesome to pin down a exact definition of a large subject on the evening sky. However for me, a wide-field picture is one which encompasses a minimal space of roughly 4 sq. levels, or about eight Full Moons side-by-side. A picture of this scale will completely body the North America Nebula (NGC 7000) and its companion the Pelican Nebula (IC 5070) in a subject wealthy with glowing clouds of hydrogen.
When your subject turns into extraordinarily huge, you end up within the realm of nightscapes — photos of the evening sky which will additionally embrace terrestrial vistas, like Orion and the winter Milky Way setting over Mount Whitney in California’s Sierra Nevada proven on web page 45. Different astrophotographers take into account these to be wide-field photos as effectively.


